Sunday, September 28, 2014

September Purchase (3) - DX Medajalibur, KO Aba Laser Set

Today's haul... All weapons, and still not gotten 1 for my little niece yet, sigh...


DX Medajalibur
Gotten it in CSC, at a price of $35... Quite cheap for a mint toy... Not sure if the price will drop in wareouse sales (if any), so decided to get it as my little nephew's Children's Day present (though he seemed to be more diverse now in his likings; also like Ben 10, Beyblade, B-Daman, etc. Hopefully he will like, hahahaha...

Edit: Damn... Just saw on Youtube this cost only $20 at a sales in Kiddy Palace last month... Probably the seller got $15 richer now... sigh...


KO Aba Laser Set
This is a very surprise find! I have been trying to make a purchase of this KO for a long long long long long time but it always ends with disappointment (seller sends wrong type, seller claims no more stock, etc)... So I was quite surprised to find this hanging up at a chapalang shop, so quickly removed it and pay after 1 quick glance at the price, hahahaha...


The set comes with some cheesy KO power rangers figurines and cute cute monsters (think from Ultraman series)... Very weird that although all 3 KO power rangers seem to be of the same pattern, only the red ranger has knee articulation, the other 2 has upper and lower legs molded as 1... I have since throw away these figurines and monsters as they are not my main purpose of buying...


The KO Aba Laser!!! The mold does not seem to be that of the DX version, and also the handle is a little short. It might be an oversized copy of the PLEX version or such. The plastic is the typical brittle thin type, but there seems to be some good limiters to limit the blade position properly (though will become loose with some shaking) and the handle swivels to both gun and saber positions securely. Anyway, will have to hunt down the sound/light circuit chip that I gotten last time from a purchase of a loose DX Aba Laser... Hopefully can find, and then install into this KO... Nice luck...

Friday, September 26, 2014

Update : Bootleg DX Sengoku Driver Restoration - Lock Seed Activation

Took 2 days to slowly restore my newly bought bootleg DX Sengoku Driver...

Opened up my bootleg DX Sengoku Driver... Looks quite bare...


Sadly, my fruit-cutting knife is missing the pegs to lock into the Driver so have to either permanently glue it or make pegs similar to the original design... I chose the latter...


I got lots of plastic pieces with weird shapes from my old KO transformers that I dismantled, and found these to suitable to make them...


A spring is cut to size to fit in-between them. Then I make a cover (with a slot space for the larger spring) to keep the pegs in place...


Done! Comparison with the authentic one...


Moving on to the lock seed activation function. I opened 1 of the bootleg lock seeds and used the back piece to mark out the necessary hole positions... As the bootleg lock seeds have the button holes molded into the back piece, I have to cut out the molded plastics to get the holes...


The holes to mark are the 2 holes at the ends... Then the 2 holes are drilled...


I used a Tamiya pin (same as that used for the Bootleg Musou Saber) for the Arms activation pin... It is attached from the inside... This is more for the DX lock seeds where they need to have the smallest button at the end to be pressed for henshin to Arms mode...


For the main lock seed activation pin, I attached a hollow plastic pipe to act as the guide...


... and found 1 of the plastic pieces in the bootleg lock seed to be quite suitable for the activation pin... a spring is cut to size... of course after many trials... The small pin head needs a small washer to push against the spring when attaching the pin in the hollow pipe...


Next, the mechanism for the lock seed activation has to link the rotating action of the knife cutting to the pin. A very simplified crank and slider (link) concept is used here. The link is made from some snap-assembly kits' plastic sprues and a small hollow pipe is used for the joint as the plastic sprue is too thin to drill a hole through...


The link is then attached to the bottom part of the crank part where the knife is attached to. Note the picture shows the screw up too high; it is later unscrewed to move down and the tip flushed to the surface to allow the crank cover to attached down properly... You'll get what I mean when you fiddle around with your set... A piece of flat plastic is hot-glued to the bottom of the other end of the link, with the end tip to be glued further away from the link, forming a slope. This will allow the slope to press down the pin when the link is pulled... I forget to take the picture of another piece of flat plastic to be placed on the top (opposite to the 1st flat plastic piece) but it can be seen in the next picture...


This is how the linkage will be attached in the Driver. I forget to take a picture of a flat piece of plastic (2 holes drilled at the ends) to screw into the 2 hollow pipes, to act as a 'supporting wall' for the slope when pressing own the pin... 2 pipes are used to act as guides for the sliding motion. When the knife is swung, it will rotate the crank and in turn pull the link to slide along in the guides, and the slope will press down the pin...


Edit: The mechanism for activating the lock seed...


Here is how the pin looks like in normal mode: Pin is retracted...


Next mod for this bootleg DX Sengoku Driver will likely be adding a "Lock On!" sound and also the knife-cutting sound (probably the KR Gaim face-plate version)...

When knife is swung down, the pin will pop out and pushes the main activation switch of the lock seed... Nice...


And is a video clip to show how the bootleg Driver is able to work quite well after the restoration... You can search Youtube for the original un-modded bootleg DX Sengoku Driver, as well as that of the earlier version...


Edit: This 2nd version of bootleg DX Sengoku Driver can also attach the Kachidoki and Kiwami lock seeds for the Dai Shogun mode...

Wednesday, September 24, 2014

September Purchase (2) - Bootleg DX Sengoku Driver with Lock Seed Holder Set

Bought this from Taobao.com at a price of approximately $43.40, inclusive of shipping (and 2 fake leather belts), through my Taobao agent... There was an earlier bootleg / KO version of the DX Sengoku Driver but was quite done badly, so one of the Taobao shop seller requested the manufacturer to tune up that driver, particularly the ability to activate authentic lock seeds (which was missing in the earlier version)... Apparently there was some miscommunication between them, as in the end, the manufacturer still left out this activation function, and instead added a small pin to be able to activate the "weapon mode" button of the authentic DX lock seed... However, this newer version is now more closer to the authentic version, with (supposedly) removable cutting knife, removable face plates, proper belt straps (but they are molded from another DX driver's belt straps) and connector, and such... There are some forum talks in the China sites that discuss how the lock seed activation mechanism can be done, so I am very eager to try to start doing that... hehehe ...

Here's the item's packaging box, and the last picture shows the de-tombed item... I believe it uses the authentic gift-set's design as reference... Looks good so far...


The main driver's body. Plastic material is almost similar to that of the authentic one - transparent/opaque dark blue at the correct parts, not brittle feel... In fact, when I look at the back, the details (less the Bandai words) are almost the same, right down to which parts are matte and which are shiny. Battery cover works exactly the same... The lock seed locking piece can also be opened like the authentic version to let the lock seeds be pulled out, in case the lock seeds are accidentally removed without opening the lock ...


As the inside the body seems to have some parts dropped out or such, I dismantle it to take out / repair any loose parts and at the same time have a look inside.... Turns out an extra piece of on-off switch cover is left inside accidentally... There should have quite a lot of space to put in the lock seed activation mechanism and also some sound chips to add / replace the bootleg sound (weird weird sword clashing sounds)...


Unlike the earlier KO version, this bootleg set comes with 2 interchangeable face plates (KR Gaim's and KR Baron's), just like the authentic version... Nice... But of course, just like any other bootlegs, do not expect this KO Baron's face plate to be able to work on the authentic DX driver to produce the KR Baron henshin music, as it uses the same mold as KR Gaim's... The drawing on each face plate is actually a transparent sticker..


The cutting knife is now "perfect" without joint lines on the blade. But this makes it less show accurate, as many episodes show the knife with joint lines as seen in the DX toy... But anyway, this cutting knife looks better to me... And it is made of hard plastic...


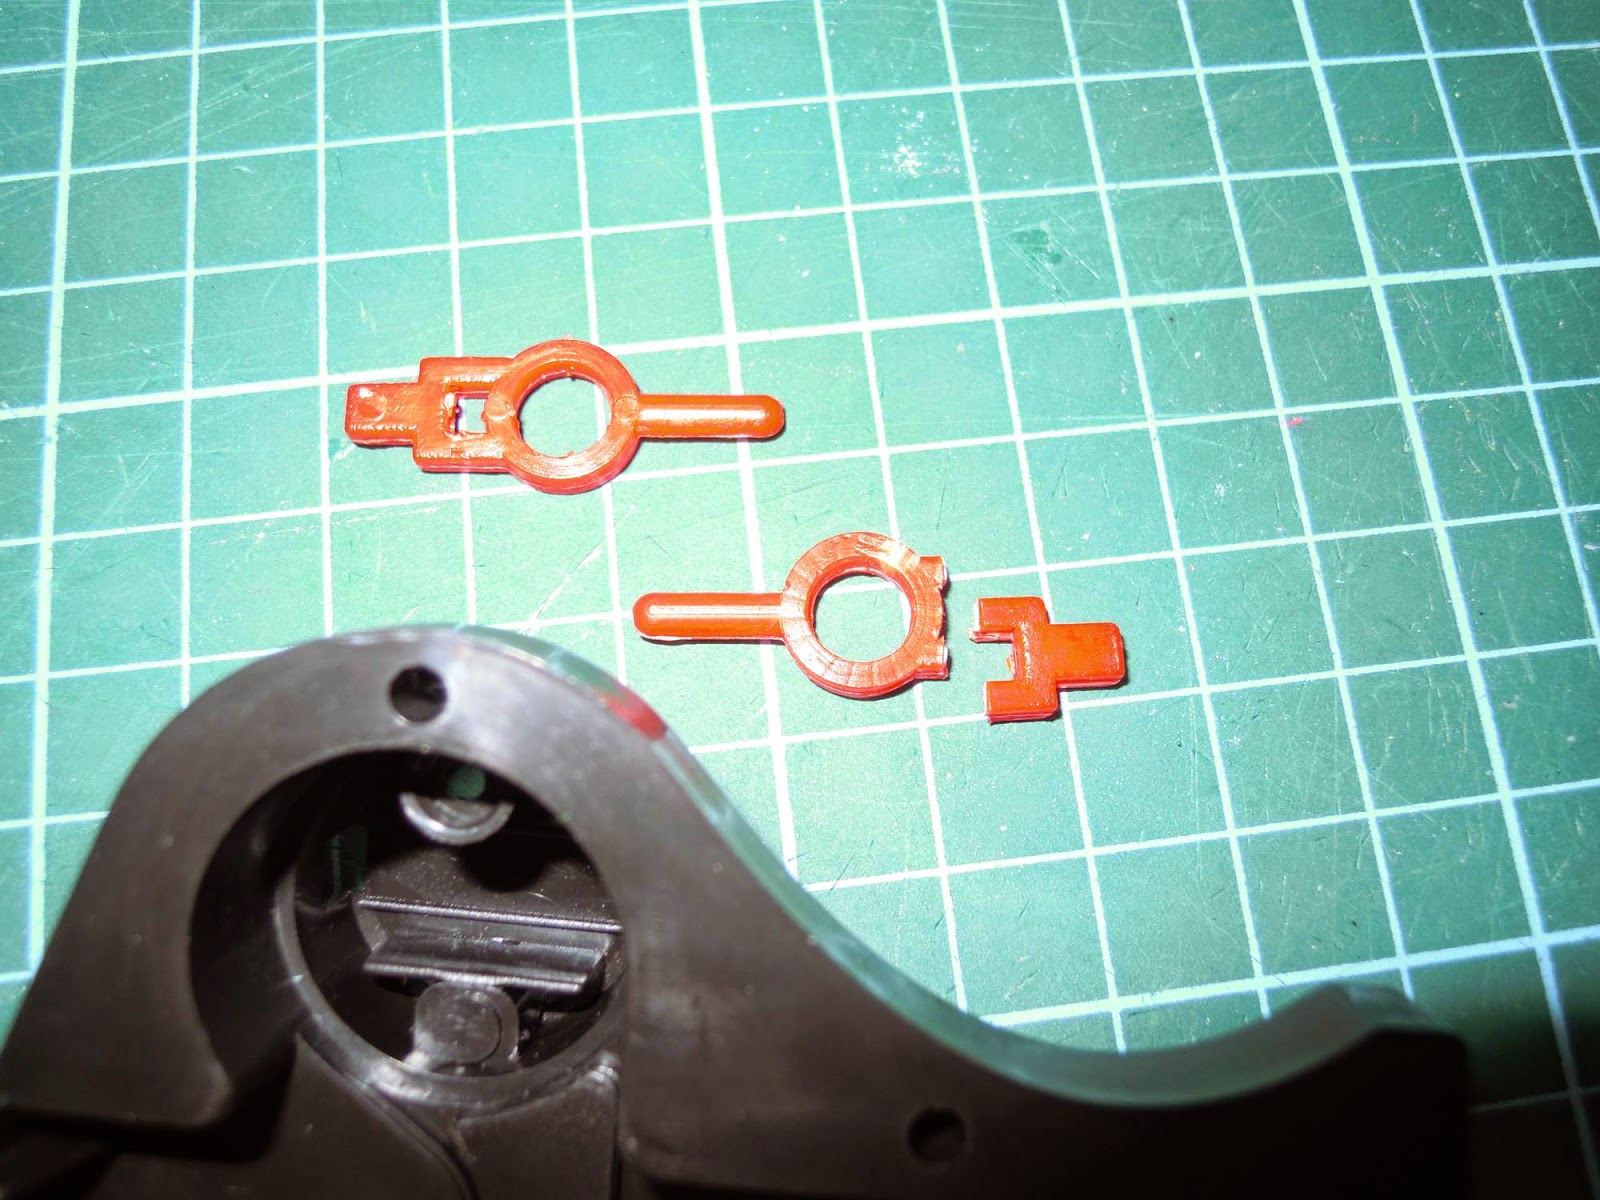
Sadly, my cutting knife is missing the 2 tabs at the side to lock it into place... Should not be too tough to make 1 though... Just need some time...


For the belt straps, the straps themselves seemed to be slightly thicker and less flexible than the authentic one. The buckle and straps themselves are actually molded from that of DX Double/W Driver's... Not surprising, as the manufacturer came out with quite good bootlegs of the DX Double/W Driver before... The connectors are very well made (though I have not try putting them into the driver yet...), and could even pass off as the legit stuff...


The lock seed holder is a bit lighter (I think), but still a relatively good bootleg. The back of the holder is actually more well-made than the front side... And the tabs are still spring-pressed to allow the lock seeds to be held securely..


And now, the lock seeds... I really don't like them... or perhaps just the sounds... I have strongly in mind to use their bodies (after some light mods) to replace some of my gashapon/candy toy lock seeds bodies... Yeah, I think I will do that...... There are only 2 sounds (same for all 3 lock seeds) - (i) When open the lock seed - " ~(lock seed open sound)~ P~i~n~e !" (ii) when the only small button on the back is pressed - " ~(machine start sound) Battle start! Y~o~u l~o~s~e..." Sigh... forever losing... hahahaha...


The bootleg Orange lock seed has transparent yellow plastic inside, and the stickers are not Orange's but Pineapple's... strange... maybe the manufacturer cannot differentiate between orange and pineapple... The bootleg lock seeds do seem to have retain the spring-flip function of the cover though...


..As well as the on-off switch... Nice... Notice the mold uses a 3 battery compartment as used in the authentic DX versions... The 3 back buttons are now reduced to only 1 (the middle one), the the other 2 are molded together with the main body... And NO SAD PAC-MAN !!!!!! hahahaha....


Overall, this is a very very very nice bootleg... More so if considering the very poor quality of the first KO version, this is indeed a very improved version... Will try to fix up the cutting knife's pegs and also the mechanism for activating the lock seed button asap... After all, Kamen Rider Gaim series will be ending this coming Sunday...

Friday, September 12, 2014

Quick Demo of KO / Bootleg DX Daidaimaru

A quick demo of the KO / Bootleg DX Daidaimaru that I bought recently... The figurine was thrown away, as promised...


Update: KO / Bootleg DX Musou Saber - Lock Seed Activator Restoration

The super simplified bootleg DX Musou Saber looks good on display, but it is seriously lacking in the most fun part for most KR Gaim toys involving lock seeds - activating the sounds of the lock seed!!! So I borrow the method of triggering the switch of the lock seed from a forum page in Baidu.com to do this mod, a very special thank you to the forumers there!!!


Unscrew and take the Musou Saber apart. Take care not to loose any parts (though it has no much parts left after such simplifications....)


The authentic lock seeds cannot fit initially, due to the bottom of the lock seed has a small tab that will stop the lock seed from sliding into the hole. Mark out the area to cut using any authentic lock seed. This space, after cutting, will allow the lock seed to go in (as in the authentic ones, there is a small lock mechanism at that position...)


Cut out the hole in any way you can... Not easy, as this type of "shampoo bottle" plastic cannot is too 'rubbery' to be cut properly, as it wll tend to leave thin rubbery burrs that is hard to remove on the cut edges... Filing is also out of question... Anyway, finally done...


Do trim flat the side "clips" too, they are making the hole way too tight for the lock seedsto fit in...


And now the authentic lock seeds can fit in... Next, to make the lock seed activator...


Open up any DX lock seed to obtain the back piece. Be careful when opening, watch out for the small spring inside and not lose it. Keep all pieces safe.


Use the lock seed back piece to locate the positions of the top 2 switches. You can use something sharp to scratch the surface to mark out the holes...


Once holes are marked out, they can be cut/drilled... Remember to assemble the DX lock seed back safely asap...


I use a small Tamiya plastic pin (to attach from behind) for activating the lock seed's 2nd switch (to switch DX lock seeds to weapon mode). You can also use a small screw to screw in from behind... The pin should protrude around 4mm out...


Then I proceed to make an extension lever (with some spare plastic sprue rims) to attach to the trigger. The lever will slide in to push the main activation switch (a pan head machine screw is attached to the tip) on the lock seed, when the trigger is pressed. Trial and error need to be done to check for the joining positions. Hot-melt glue is used for joining.


Next, glue up more pieces of waste plastic to support the lever so that it will not flex but slides horizontally nicely. The final positions of the top supporter piece is drawn in red dotted lines (maybe I will take some pics of the new position next time when modding for the sounds)


Looking from the other direction. The lever has to be inside the supporters pieces... The tips of the 2 supporter pieces are hot-glued but with a gap left in between...


Edit: A picture on how the final positions of the supporter pieces and hot glue to join them...


A small spring is cut to size and placed here to aid in the springing back of the activator (and trigger)...


And here is how it works: Before pulling the trigger...


When trigger is pulled...


And a demo clip...